- The ultimate guide to improving your photography
The ultimate guide to improving your photography
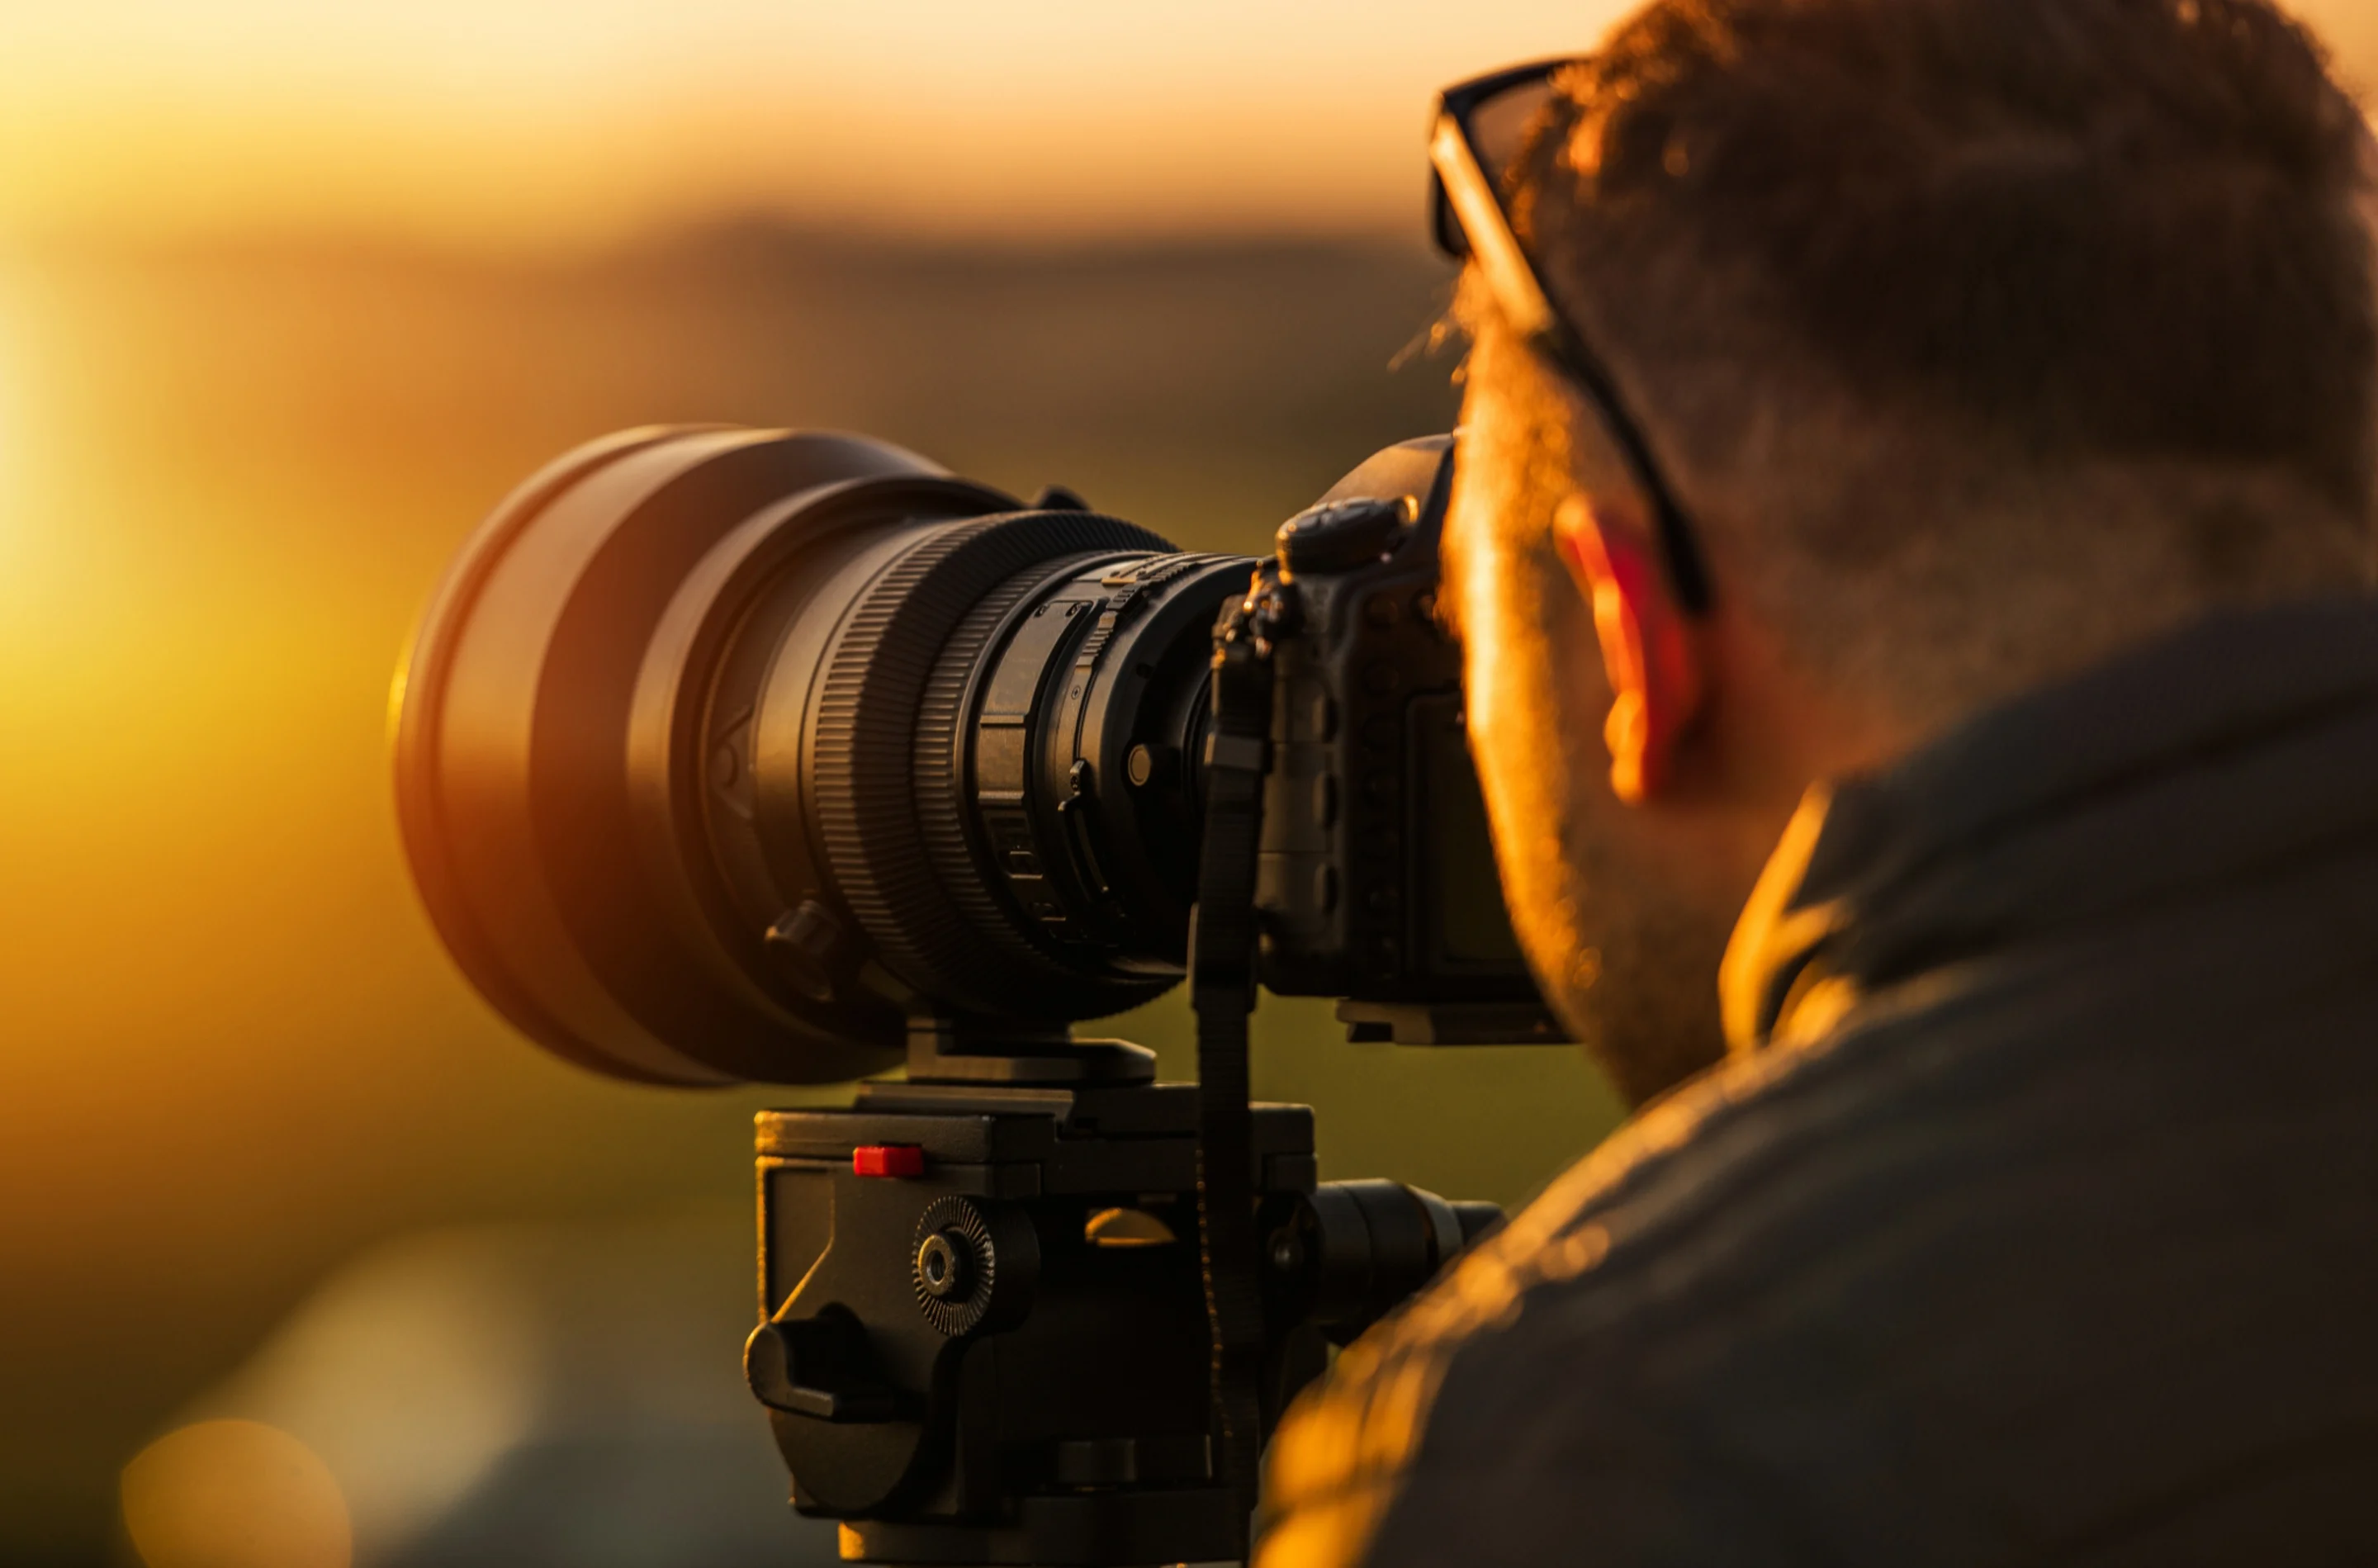
Photography has become an accessible art form, with almost everyone having access to a camera and editing software(opens in a new tab or window). This accessibility has led to a new generation of amateur photographers.
For those who aspire to move beyond the beginner stage, a solid grasp of aperture, shutter speed and ISO can significantly set apart a seasoned photographer from a casual one.
While there are no strict rules for composing your photographs, certain techniques can help you create clear points of interest and well-balanced images. By understanding and applying these tried-and-tested methods, you can experiment with different ways of capturing your subject and expressing yourself.
Below, we’ll explore essential techniques and provide valuable tips to enhance your photography skills.
Table of contents
What is the exposure triangle?

The exposure triangle refers to the relationship between three fundamental elements: aperture, shutter speed and ISO.
These elements work together to control the amount of light that reaches the camera's sensor (aperture and shutter speed) and the sensitivity of the sensor to that light (ISO).
Aperture, which affects depth of field, is the opening of the camera lens which allows light into the camera body. Shutter speed influences motion capture and refers to the speed with which the camera’s shutter opens and closes. ISO is the sensor's light sensitivity and greatly affects overall image quality.
Adjusting one element requires compensation of the others to maintain correct image exposure, otherwise known as an exposure value, or EV for short. Exposure value indicates whether an image will be underexposed (less than 0), overexposed (greater than 0) or correctly exposed (equal to 0).

A correctly exposed image has an EV of 0, but different combinations of aperture, shutter speed and ISO can yield the same EV, resulting in varied image effects and depth of field.
For instance, if you reduce your shutter speed by two stops, you'd have to increase your aperture or ISO by two stops or adjust each by one stop to maintain the same exposure.

How does aperture affect your image?
Aperture refers to the opening in your camera's lens that dictates how much light enters the camera. A wide aperture allows more light, whereas a small aperture allows less.
The size of the aperture is measured in focal stops, or f-stops, and is based on the diameter of the hole through which light enters the camera.
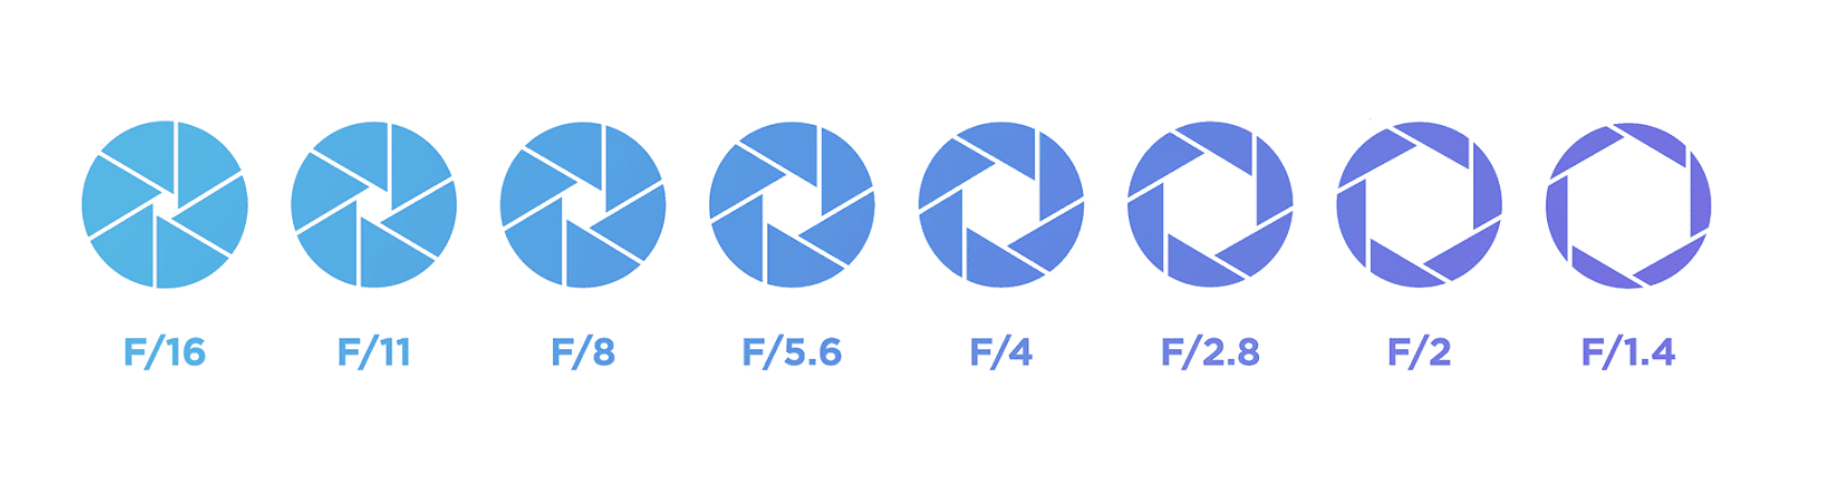
A smaller, more closed aperture corresponds to a higher f-stop number (i.e. f/11, f/16, f/22), producing a darker image. On the other hand, a larger aperture lets in more light, leading to a brighter image and is indicated by a lower f-stop number (i.e. f/1.4, f/1.8, f/2.8).
Besides managing the light level in an image, the aperture also plays a crucial role in defining a photo's depth of field, which determines how much of the image appears in focus.

Using lower f-stops ensure subjects take center stage against softly blurred backdrops.

Higher f-stops ensure all subjects are in focus.
A Beginner's guide to depth of field
For images with a sharply focused subject and a blurred background, you need to use a wide aperture (low f-stop number i.e. f/2.8), creating a shallow depth of field. This technique is particularly effective in portraiture, wildlife and sports photography to highlight the subject against the backdrop.

Using a wide aperture (i.e. f/2.8) can also produce a 'bokeh' effect—a sought-after blur effect for areas outside the subject’s focusing distance.
To increase the focus around the subject, reduce the aperture size (switch to a higher f-stop number i.e. f/8 and above) to expand the depth of field. A larger DOF is useful for landscape photography, or scenarios where there are multiple subjects or elements in the background you want to appear in focus.

Small (or shallow) DOF blurs the area around the subject. Large DOF keeps more of the area behind the subject in focus.
Understanding Aperture Priority

Aperture Priority is a shooting mode found in DSLRs, mirrorless and some compact cameras. In this mode, the photographer manually selects the desired aperture value, and the camera determines the necessary shutter speed and ISO value (if on auto ISO) based on its metering system to achieve correct exposure.
This mode is denoted by the letter "A" on most cameras, while Canon labels it as "Av."
All four shooting modes require manual adjustments for ISO, white balance, exposure compensation, metering mode and others.
There are four basic camera techniques, wider or greater depth of field, shallow depth of field, motion blur and freezing motion. Aperture Priority ensures the best exposure for these techniques, offering versatility not found in Program mode and faster shooting than in Manual mode.
Aperture Priority vs. Manual Mode

Manual mode offers precise control over camera settings, making it ideal when light conditions are stable, allowing time for adjustments, especially when using a tripod. However, the need to continually adjust various elements can delay shooting.
Aperture Priority requires fewer changes. With the shutter speed automatically matching your programmed aperture settings, correct exposure is ensured by the camera's auto-metering system, which provides the advantage of speed.
While Manual mode is favored for studio-based photography, there are instances where Manual may outpace Aperture, Shutter or Program modes in speed—specifically when light is unbalanced and metering is inconsistent. In such cases, a manual shooter with a good understanding of exposure values can adjust the shutter speed or aperture values for appropriate exposure, whereas a semi-auto shooter would need to modify exposure compensation, metering mode, or both.
What is shutter speed?
Shutter speed refers to the duration the shutter is open, exposing the sensor to light. It's measured in fractions of a second (like 1/125) and influences the clarity of your image, similar to aperture. Its effects are most noticeable when capturing moving subjects.

Fast shutter speeds freeze motion, while slower ones create motion blur. To maintain a balanced exposure triangle, adjustments to the other two settings are necessary when changing your shutter speed.
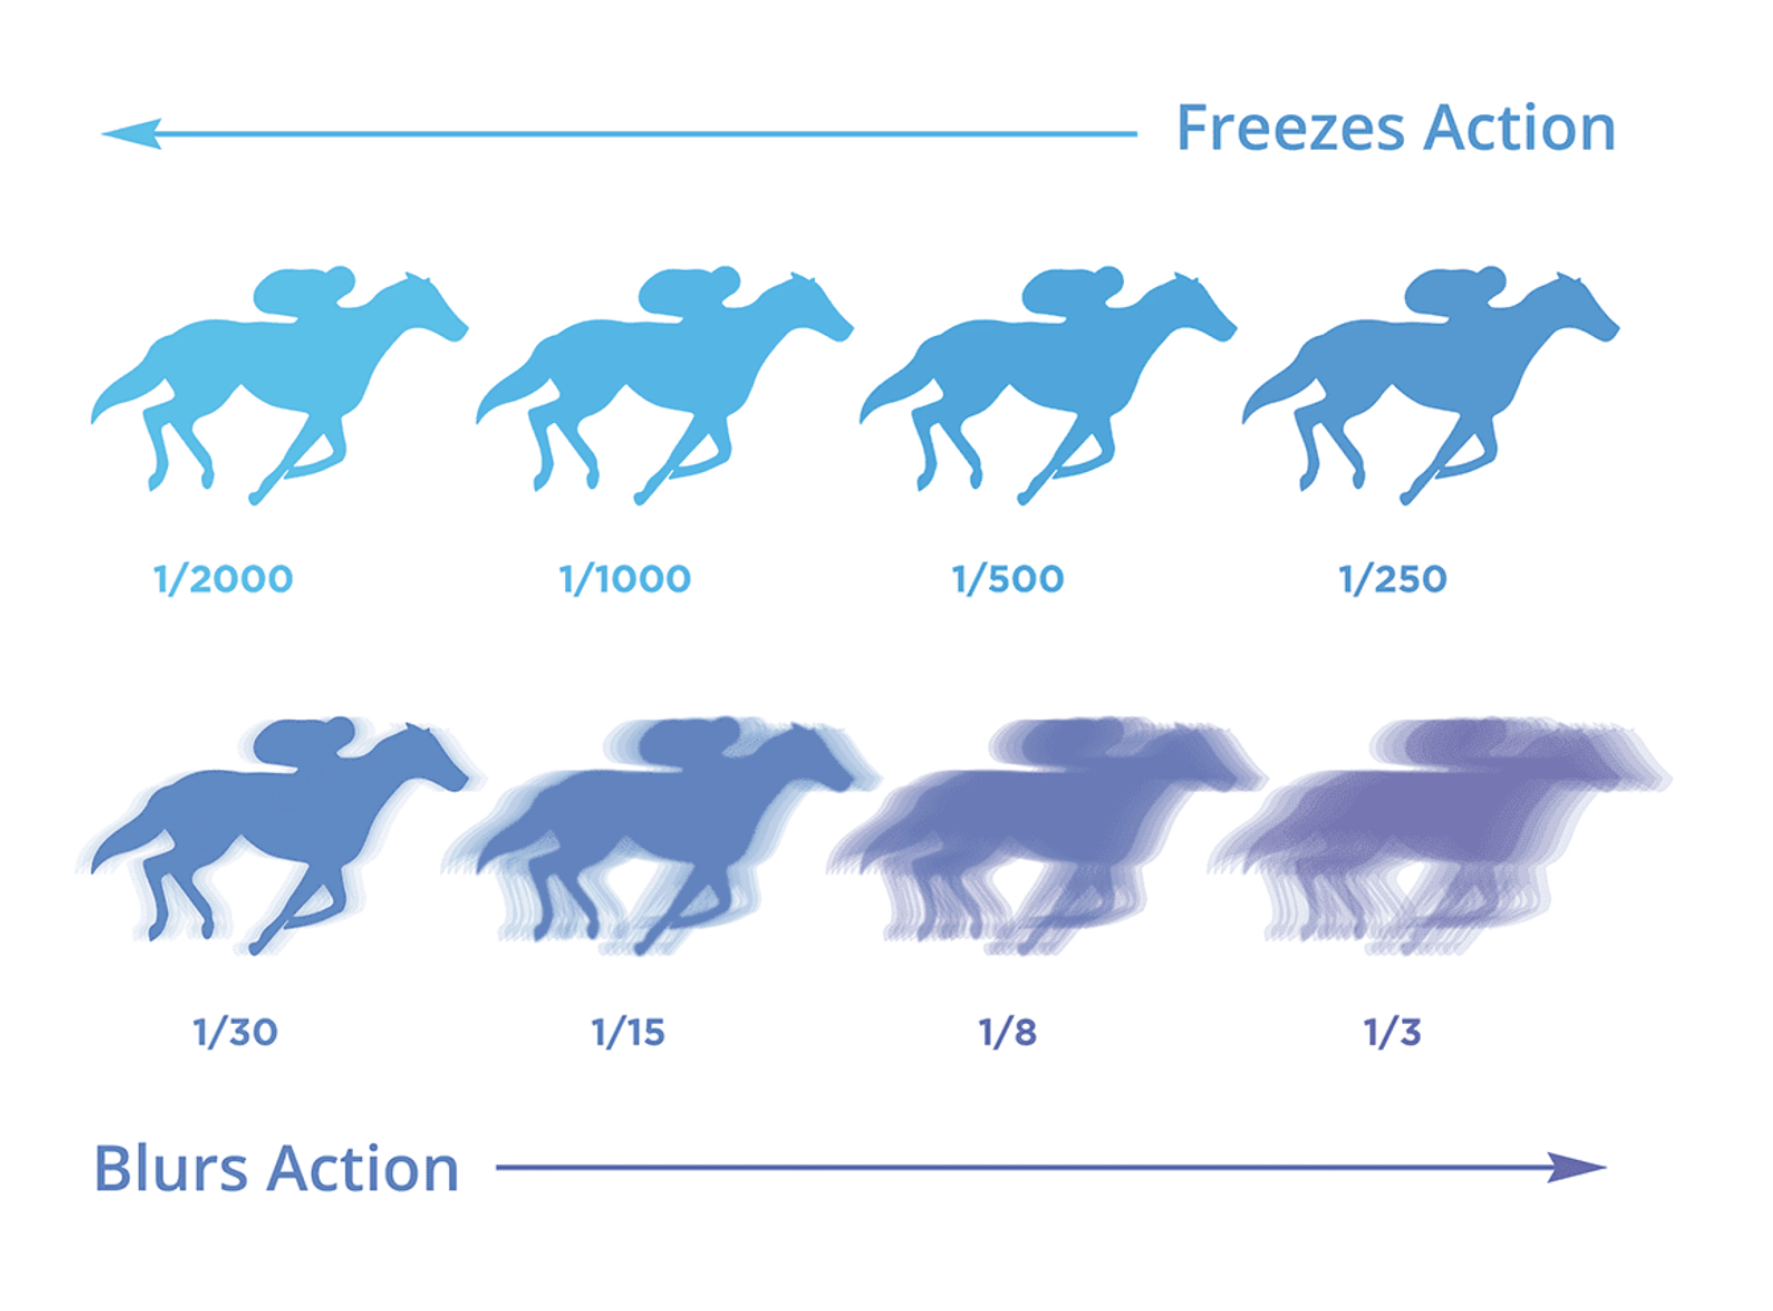
A slow shutter speed (i.e. 1/60 or below) leaves the sensor exposed for a longer period, causing moving objects to appear blurred in the image. This effect is often intentionally used by photographers to depict motion, such as a speeding train, star trails or flowing water.
A fast shutter speed (1/250 or above) exposes the sensor briefly, capturing the scene in a split second and freezing motion. This is useful when you want to capture a moment in time without any blur.

How to avoid motion blur and take sharp images
When modifying your shutter speed, it's important to note that a tripod or lens with image stabilization might be needed for maintaining image sharpness below 1/80 of a second. This is because even the slightest micromovement during handheld shots can lead to image blur.
The slowest setting for capturing clear handheld photos changes based on the focal length of your lens. The greater the focal length, the higher the likelihood of camera shake. As a rule, if you're shooting with a 200mm focal lens, opt for a shutter speed faster than 1/200 of a second. In general, the lowest shutter speed recommended for any lens is roughly 1/60 of a second when handheld.

Tip: Cameras offer a semi-automated mode, known as Shutter Priority (S or Tv), which lets you manipulate the shutter speed while automatically determining the other two settings for you.
What is ISO?
The final part of the exposure triangle is ISO, which simply affects how sensitive the camera's sensor is to light.
In low-light situations, a higher ISO (800 and above) makes the sensor absorb more light, helping you capture the atmosphere without the use of flash. In bright settings, a low ISO of 100 or 200 should let the sensor absorb enough light.

But be cautious when using high ISOs, as they can make your images appear noisy or grainy, reducing their overall quality. It's best to keep your ISO as low as you can for sharp and detailed images. Photo editing software can be used to reduce the appearance of image grain, but you should opt to capture quality images in camera as much as possible.
What is exposure metering?
An exposure meter is a handy tool in Manual mode, aiding you in measuring your exposure value (EV) and ensuring a balanced exposure triangle. You use it by aiming the lens at the scene you're capturing and watching how the exposure value shifts as you modify each setting. An EV of 0 indicates that the image is correctly exposed.
What does exposure compensation mean?

Exposure compensation offers a straightforward method for modifying exposure when using Manual, Aperture Priority or Shutter Speed Priority modes. It's ideal if you want an image purposely brighter or darker than the standard EV of 0. Adjusting the marker on the scale accomplishes this, simply move it up to lighten the subject and down to darken it.
How to read your histogram

A histogram is a graphic tool which helps adjust a photo's exposure. It displays an image's brightness on the horizontal axis, with pure black on the left and pure white on the right. The vertical axis represents the number of pixels within this range. A 'correctly' exposed photo usually has most of the graph in the middle.
However, 'correct' exposure depends on what you want from the image. If you intentionally underexpose or overexpose an image through your camera settings for aesthetic reasons, then that's the 'correct' exposure to meet your creative objective.
Overexposing images can create light, dreamy and impressionistic effects. If you set your exposure based on the shadows of your image, you can get a glowing, overexposed photo where the light background fades to white, and the subject looks softer.
Conversely, if you want a dark, shadowy or moody image, try letting less light into your camera sensor. Dark or black backgrounds can add drama to a photo.
What are the different image sensor formats?
The three primary senor formats are full-frame, APS-C and micro-four thirds.
The full-frame format is designed for professional use and parallels the size of a standard 35mm film camera.
The APS-C format is slightly smaller than a full-frame and is the go-to sensor for most consumer digital SLR cameras.
Lastly, the micro four-thirds format is a fraction of the size of both full-frame and APS-C sensors. This smaller format is typically found in more compact camera models.
Each format offers its unique advantages and is chosen based on the specific requirements of the photography at hand.
What is your camera’s aspect ratio?
Aspect ratio refers to the relationship between an image's width and height. It plays a crucial role as it impacts the composition of your photograph and its eventual size. The aspect ratio is primarily determined by your camera's sensor size, calculated from the image's width and height (W:H). For example, a camera sensor measuring 36mm wide and 24mm high would have an aspect ratio of 3:2.
If panoramic landscapes are what you're aiming for, a 16:9 aspect ratio would be suitable. If your goal is to post images on Instagram, a 1:1 ratio is ideal. For most photography, a 3:2 or 4:3 ratio should do the trick.
3:2 Aspect Ratio
Full-frame digital cameras and APS-C crop sensors on entry-level DSLRs adhere to the 3:2 aspect ratio, a standard derived from the 35mm film frame.

4:3 Aspect Ratio
The 4:3 aspect ratio is generally used by cameras with smaller sensors, such as compact cameras or smartphones. This format is also employed by smaller, micro four-thirds cameras.

1:1 Aspect Ratio
The 1:1 aspect ratio, also known as the square format, is predominantly used by medium format cameras. While not frequently used in digital platforms, it became popular when Instagram was adopted it in 2012.

16:9 Aspect Ratio
The 16:9 format, considered panoramic due to its width, captures a broader area than other aspect ratios. Preferred by landscape photographers and filmmakers for its cinematic appeal, it's now the standard for television and online content, overtaking the 4:3 video format in the late 2000s.

How to choose the right camera body for your photography style

When it comes to selecting a camera, you want to consider choosing a camera that will grow with you as your style and skills evolve. There are several elements to consider, such as image quality, resolution and budget.
The camera you choose should be capable of producing high-quality, crystal-clear images. This is why DSLR and mirrorless cameras are commonly favored by photographers due to their superior image resolution.
A camera with a higher image resolution enables you to capture images with more detail. For stock photography (portraiture, fashion, lifestyle), it is recommended to use a camera with at least 25 megapixels to ensure your images meet industry standards.
For sports or wildlife photography, a camera with a high burst rate is essential. This means the camera should have the capability to capture images continuously at a rapid speed. While most basic cameras can capture images at a speed of 5 frames per second (fps), to ensure no moment is missed a camera capable of shooting 8 fps or more is preferable. Some advanced models can even capture up to 24 fps.

For sports and wildlife photography, the camera you select should boast a top-notch focusing system. Many basic cameras come with a slower auto-focus and limited focusing points, which could lead to missed photo opportunities.
You want to find a camera that has a good dynamic range, performs well in low light conditions and is capable of using interchangeable lenses as different genres of photography require different focal lengths.

Budget, of course, is the most important. Cameras significantly vary in price. It's wise to determine your budget first and look for the best camera within that range. Keep in mind that investing in a good lens could be more beneficial than spending all your money on a camera body.
Specific models like the Sony a7III, Canon R5 mirrorless camera or the Fuji GFX series are often recommended due to their excellent performance and high resolution.
What lens focal length is right for me?
The lens is responsible for transferring the image onto the sensor, and if it fails to render a sharp and clear image, the resulting photograph will appear blurry, regardless of the resolution of the camera's sensor.
The focal length refers to the distance from the lens to the sensor when the image is in focus. This information is usually indicated on the body of the lens in millimeters.
For general stock photography a kit lens, like the 18-250mm, is fine. But, for improved quality, it’s best to invest in a prime lens. Despite its lack of zoom functionality, prime lenses have superior glass which results in sharper images. A 35mm or 85mm lens is a good starting point as they mimic human eye perception.
For sports or wildlife photography, a telephoto lens is required. These lenses allow you to zoom in on distant subjects. While they can be costly, used options are available online. Autofocus telephoto lenses with image stabilization are recommended for their enhanced performance. Telephoto lenses are plentiful, but 200mm is a good starting point. For greater magnification, lenses up to 400mm or more should be used. More affordable versions like the Canon EF-S 55-250mm and Nikon AF-P DX 70-300mm offer variable focal lengths, allowing you to zoom up to 250mm and 300mm.

For specialized photography, such as product or food photography, a macro lens is preferable. This lens allows for extreme close-up shots of small subjects like flowers or insects. Macro lenses come in various focal lengths, including 35mm, 50mm, or even 100mm. For extremely close shots, a 35mm or shorter would be ideal.

An ultra-wide lens, characterized by a focal length shorter than the height of the camera sensor, offers an expansive visual angle perfect for close-ups and panoramas. For a full-frame sensor, lenses with a focal length of less than 24mm are considered ultra-wide, while for smaller APS-C sensors, lenses shorter than 15mm qualify as ultra-wide.
Standard focal lengths for ultra-wide lenses include 21, 20, 18, and 14mm. There are two types of ultra-wide lenses: curvilinear and rectilinear. The former gives images a rounded and slightly distorted appearance at the edges, while the latter maintains image proportions. Ultra-wide lenses are commonly used for landscape photography due to their wide visual angle, architectural photography for capturing small spaces and large structures, and extreme sports like skateboarding for detailed close-ups of athletes performing stunts.

A wide-angle lens, similar to an ultra-wide lens, has a focal length shorter than the camera sensor but covers less ground. Typical focal lengths for wide-angle lenses are 35, 28, and 24mm. This lens provides a broad visual angle which makes it ideal for capturing images in tight spaces that regular lenses might struggle with, without the excessive distortion often associated with some ultra-wide lenses. Wide-angle lenses are commonly used for landscape and architecture photography thanks to their extensive visual coverage.

What is the difference between RAW and JPEG file formats?
RAW is a general term encompassing numerous file extensions such as Nikon's NEF and NRW, Canon's CRW, CR2, and CR3, and Sony's ARW, SRF, and SR2. Most widely-used editing suites can interpret these files, although due to manufacturers' constant adjustments to their RAW algorithms, these software need ongoing updates for compatibility.
Essentially, RAW represents the camera's unprocessed data, preserving all image details via lossless compression. Despite this, it requires conversion for viewing or sharing. The rich information contained in RAW files offers considerable flexibility during computer editing. For instance, 12-bit RAW can capture up to 68 billion colors, ensuring the preservation of most details in the image even after editing. RAW files are also immutable, meaning they cannot be altered. This attribute makes them reliable proof that no modifications have been made to an image, which is particularly important in professional photography and legal contexts.

JPEG, stands for 'Joint Photographic Experts Group,' and is a widely recognized image format created in 1992. It employs lossy compression to store and display images. The compression rate can be adjusted via the camera or an editing suite, with a trade-off between detail retention and file size.
Despite losing some details, JPEG files can still contain up to 16 million colors, making them ideal for social sharing and printing. They are compatible with almost any device, allowing convenient viewing. Adjustments and filters can be applied directly in-camera, enabling immediate use of images. Their relatively small file size allows for more pictures to be stored on your memory card without worrying about your camera's buffering rate.
Should I choose RAW?
Professional photographers often opt for RAW files as they offer the potential for higher-quality images. While not as convenient as JPEG, RAW files provide more vibrant colors and detail and allow for exposure adjustments without damaging the image.
However, if you don't plan on editing your images, JPEG is the obvious choice. It enables faster photo sharing and allows for more photos to be taken with limited storage.

Another option is to shoot in both RAW+JPEG formats, usually found in your camera's menu under ‘Image Quality.’ Having both JPEG and RAW versions provides the advantages of both formats. It's worth noting, this will create two files for each image, taking up more memory space and potentially slowing down your camera’s buffering rate.
The importance of staying organized with external hard drives
If you’re a hobbyist, storing files solely on your computer may suffice. However, if you intend to shoot large RAW files or shoot professionally, it's a must to back up files using an external hard drive.

Effective file organization becomes crucial when dealing with hundreds or even thousands of photos.Keeping copies of your images on an external hard drive ensures you have a backup should any files get lost or corrupted.
Nowadays, two-terabyte hard drives are affordable, often under $100. For photographers frequently on the go, investing in waterproof or shockproof options, although costlier, offer added security.
Understanding and managing your camera’s white balance
The Automatic White Balance (AWB) setting is a feature that allows your camera to estimate the optimal balance for your photograph. Most digital cameras come equipped with AWB presets such as daylight, cloudy, shade, tungsten and fluorescent.
If you're indoors, it's advisable to opt for the tungsten preset for incandescent lighting or fluorescent if you're in an area illuminated by fluorescent lights. These presets are conveniently named, making them easy to remember.

While AWB can generally determine the best setting for a given situation, setting a custom white balance value often yields the most accurate results.
To set a custom white balance, you'll need a white piece of paper. In the same lighting condition as your subject, capture a photo of the paper filling most of the frame. Then, navigate to your camera menu and locate the custom white balance option. Select the image of the white paper you just photographed and set this as your custom reading. With this custom white balance setup, your subsequent images should appear much more true-to-life.
A guide to making the best of available light
Window light presents an easily accessible source of light, ideal for portraiture. The soft glow of natural light can create flattering effects, and you can achieve professional-quality results even with minimal equipment.

Start by turning off any artificial lights in the room. Experiment with adjusting window coverings to manage the light direction and produce intriguing shadow patterns. If you don't like strong shadows on one side of the face, using a simple white reflector can balance this.
Experiment with the distance between the model and the window. Position the model facing the light, and place yourself between the model and the window without obstructing the light. This arrangement can yield delicate portraits with appealing catchlights in the eyes. Using a shallow depth of field can help blur the background, further enhancing the effect.
It's a common recommendation for photographers to position the light source behind them to avoid backlighting their subjects. This is due to the camera's tendency to focus and adjust exposure based on the brightest area of the image, which can result in the main subject being overshadowed or blurred. However, we don't always have control over the placement of the subject or the light source.
Backlighting can be used creatively to make atmospheric images. Manual focus and exposure adjustments are recommended to manage backlighting. It creates dreamy, washed-out images, especially during golden hour. Backlighting is also preferred for photographing transparent objects like clothing or capturing subtle trails of smoke or mist. Backlighting can produce lens flare for a summery aesthetic and silhouettes for strong, simple shapes. An ordinary street scene can be transformed into a dramatic silhouette-filled image with golden light when underexposed and shot directly into the sun.

Photographers often refer to the brief period before sunrise and after sunset as the 'blue hour.' This time offers a unique, atmospheric light that casts strong side light, ideal for emphasizing textures and forms. The blue hue pairs well with complementary shades of orange from sources like candles or street lights, creating images rich in contrasts. The limited light can be challenging, often requiring a slow shutter speed or tripod use. This is particularly effective for seaside imagery, where the slow shutter speed blurs water movement, and the blue light on blue water creates a serene, minimalist effect.

The renowned 'golden hour' provides an effortless setting for breathtaking photos, making it a favored time for photographers. This period offers warm, soft and golden light that enhances portraits and landscapes. Since golden hour is fleeting, it's crucial to familiarize yourself with your shooting location in advance, ensuring you know the best spots and time for capturing your images.

While overcast lighting may seem uninviting for photography due to its seemingly flat light and dull cloud cover, it actually serves as a large light diffuser, ideal for portrait photography. The key is to find the light direction to create 'catchlights' in your subject's eyes. Having your model look up towards the sky can achieve this.

Overcast light often neutralizes color, turning everything into muted gray tones. This can be leveraged to create simple compositions. Adding a bright background, or eliminating the sky from the frame entirely can further enhance the image under such lighting conditions.
Strong daylight, while abundant, requires careful handling to yield results. One of the main challenges is the harsh contrast and distracting shadows it creates. Using a flash can help balance this by illuminating darker areas. For portraits, expose for the brighter background and use flash on the subject's face for an even, color-rich outcome. Open-shaded areas offer a softer, more manageable light. If the daylight isn't excessively bright, you can use the filtered light from a shaded tree to introduce patterns into your shot. The advantage of strong daylight is the opportunity to use high shutter speeds for capturing fast action shots.

Artificial light encompasses a broad spectrum of light sources, including on-camera flash, off-camera strobes and constant lights such as LEDs, as well as environmental sources like lamps and neon signs.

Incorporating light into a scene is an intentional decision. More often than not, the added artificial light is intended to enhance, not entirely substitute, natural light. For instance, you might use a fill flash to lighten shadows in outdoor portraiture. In other situations, artificial light may be essential for visibility, such as photographing a couple dancing in a dimly lit room.
The primary advantage of artificial light is control and consistency when battling fluctuating natural light, which is crucial in many photographic genres. The ability to precisely adjust the quantity, direction and quality of light is invaluable.
Five Rules of strong compositions
The ‘Rule of Thirds’ is a widely used composition technique. It involves dividing the frame into nine equal parts using two intersecting horizontal and vertical lines. Placing your subject at these intersections results in a more aesthetically pleasing image. This technique fosters balanced and natural-looking images compared to center-framing your subject. Applying the rule of thirds provides more space and enhances the overall setting.

This method is also effective for landscape photography, helping to balance the scenery. By using the lines as guides, you can achieve a balanced distribution of different views in the scene. For instance, having equal parts of a grassy foreground, a mountain range and the sky.
Center-framing your subject doesn't necessarily lead to mundane shots. Seek out symmetry in your surroundings. Architecture and textures can aid in achieving symmetry, often just by altering your angle to them. Be aware that symmetrical images can sometimes appear static. To add a touch of dynamism, consider introducing an element that disrupts symmetry.

The ‘Frame Within A Frame’ technique helps to direct the viewer's attention to a particular point in the image. Search for objects or structures that can serve as a frame for your subject. Architectural features like hallways or arches, or even trees, can help focus the viewer's gaze. Try using mirrors, windows, or even the frames of your sunglasses to create a distinctive shot.

Leading Lines can effectively guide viewers through your image. Seek lines that point towards your subject. For instance, observe how shadows can be used to further frame a subject, or how trees parallel to the subject can enhance the composition. Remember, leading lines don't always have to be straight, curved lines can also guide the viewer's eye.
Introduce aminimalist aesthetic in your images by incorporating negative space around your subject. The less cluttered a scene, the more likely you'll achieve a sleek, minimalist appearance. Utilize solid backgrounds or consistent textures to emphasize your subject.
What to look for in a background
Consider your background as the canvas for your artwork. It should be clean and uncluttered to keep the viewer's attention on your subject. Aim for a backdrop that doesn't have an overload of colors or patterns, as this keeps the image neat and creates a visual contrast between your subject and its surroundings.
However, overly clean backgrounds can sometimes make your subject seem superimposed. In such cases, opt for a textured backdrop to add dimension to your images. For instance, if a concrete wall seems too plain, a wooden fence or a vine-covered wall could add depth and character. You can also remove white background(opens in a new tab or window) from your subject image to place it on a more suitable backdrop.

Use your background to convey something about your subject. If it's challenging to avoid distracting elements, utilize the busy background to narrate a story about your subject or to establish a tone for your shot. Remember, you don't always need picturesque locations for beautiful photos. Exploring your local neighborhood can reveal many undiscovered scenes that could serve as potential backdrops.
The importance of photo editing to your workflow
Capturing a photo is just the beginning, perfecting it through editing is a separate challenge. Investing in software like Lightroom and Photoshop can significantly elevate your images. To maximize these tools and create cinematic images, consider watching tutorials and experimenting with tools like the Canva photo editor.
For professional tasks, it's advisable to strive for images that reflect reality and maintain true-to-life colors as much as possible. The four editing techniques below should be top of mind when reviewing your images.

Cropping is one of the simplest methods to entirely alter a photo. It can eliminate unnecessary or distracting areas, enhance the composition or accentuate a focal point. However, be cautious: if you intend to crop significantly, start with a large file. The more you crop, the more you compromise your image's quality and resolution. A helpful guideline when cropping is to adhere to the rule of thirds. This method visualizes your photo as being split into thirds, both vertically and horizontally, forming a grid with four lines (two vertical, two horizontal).
A blurring effect can create a sleek, clutter-free background in otherwise busy compositions. Light to moderate blurring allows you to maintain discernible shapes or scenes in your background. On the other hand, a strong blurring effect can create a soft, abstract fusion of colors and indistinct shapes. This could be ideal if you're seeking something more dynamic than a monochromatic background.
Boosting contrast is an effective way to add vibrancy and a touch of drama to your image. It results in brighter whites, darker shadows and a broader range of tones, thus enhancing your image beyond its real-life appearance. Conversely, lowering contrast can lend a more uniform, flat tone to an image. Like saturation, excessive contrast isn't beneficial as It can result in overly bright highlights and too-dark shadows, leading to loss of detail.
If you find your images to be too dark, adjusting the brightness might correct this. Remember, altering the brightness will affect the entire image, making everything brighter (or darker). This adjustment should be made gradually to not to create overly highlighted areas where information can’t be recovered. Tweaking the contrast often helps in achieving balanced and improved results.
Establish a digital presence with your photography
In today's digital age, having an online presence is crucial to attract clients.
While social media platforms like Facebook or Instagram can showcase your work, not everyone uses these platforms. Having a dedicated website that features only your curated work can make you stand out and will give people a better sense of your style.
Websites such as Squarespace, Wix, Format or Canva offer professional-looking portfolio pages and include image hosting, licensing and the ability to sell prints.
Once you've selected your best images, it's time to arrange them. The goal is to create a flow that narrates a story from the first to the last photo, evoking an emotional response from viewers that encourages them to hire you.
It's essential to maintain focus in your portfolio. You might be skilled in various photography genres, but a too-diverse portfolio may appear disorganized to potential clients or editors. Pick one or two specialties that you're most passionate about and categorize them into separate themes in your portfolio.
Photography is a continuous journey of learning and growth. It's a dynamic art form and constantly evolves with you. Each image taken is an opportunity to learn new techniques, experiment with different light scenarios or discover a new perspective on the world.
Trends in photography change over time, which require ongoing adaptation. The advent of new technology and editing tools continually redefines what's possible, pushing the boundaries of your creativity. Every day spent behind the lens is a step forward, allowing you to further your skills and understanding of this medium of self-expression. We hope you’ll continue this learning journey with us here.

Written by
Susan Villemaire


